Learn how to build a simple biogas scrubber to remove H2S and CO2. Improve efficiency and protect your equipment with this DIY purification guide.
Key Takeaways
- Biogas scrubbing is necessary to remove harmful hydrogen sulfide (H2S) and carbon dioxide, which can damage equipment and reduce efficiency.
- A simple DIY water scrubbing system combined with an iron oxide filter can effectively purify biogas for safer, more efficient use.
- Several specialist suppliers offer biogas scrubber systems for those needing industrial-grade purification solutions.
- Regular maintenance of your scrubber system is crucial – water should be changed frequently and filter media replaced when saturated.
- Properly scrubbed biogas can extend the life of engines and appliances while significantly lowering operational costs.
This article is intended for small and experimental digesters. The media will become exhausted quite rapidly and require a lot of maintenance.
This article is for adults only. Experimenting with any flammable gas holds inherent dangers. Biogas is a highly flammable gas. On no account, act on this article unless you fully understand the safety risks in so doing and take suitable precautions.
Raw biogas straight from your digester isn't ready for prime time. Without proper cleaning, those valuable methane molecules come packaged with problematic companions that can wreak havoc on your equipment and reduce efficiency.
So, you're interested in constructing your own basic scrubbing system? You're in luck. This tutorial will guide you through the process of creating a functional biogas purification system using materials that are easy to find and methods that are simple enough for even a novice to grasp.
The Importance of Purifying Raw Biogas

Raw biogas has a number of components that can cause problems if it is used without being treated. Methane (CH4), which is the part of biogas that produces energy (usually 50-70% of biogas), is what we want. However, the rest of it is made up of compounds that can cause significant problems with equipment and efficiency. Knowing what these contaminants are is the first step in purifying biogas effectively.
Dangerous Compounds in Raw Biogas
Untreated biogas usually contains 30-45% carbon dioxide (CO2), which reduces energy content but isn't harmful. The real problem is hydrogen sulfide (H2S), which is present at concentrations between 100 and 10,000 parts per million. Even at low levels, H2S is a major issue – it smells like rotten eggs, is toxic to humans above 100 ppm, and forms harmful sulfuric acid when combined with the water vapor in biogas. Other contaminants include water vapor (which lowers burning efficiency), siloxanes from certain feedstocks, and small amounts of ammonia and nitrogen.
The exact make-up of the biogas will change depending on what you're using to produce it. Systems that use manure usually have more sulfur than those that use food waste. This means you might need to change the way you scrub the biogas depending on where it's coming from.
How Hydrogen Sulfide Damages Equipment
Hydrogen sulfide is known for its destructive effects on equipment. When hydrogen sulfide and water vapor in biogas combine, they form sulfuric acid (H2SO4). This acid is notorious for its aggressive corrosion of metal parts in engines, pipes, and appliances. This corrosion can drastically reduce the lifespan of equipment. Equipment that should last for years may fail in months if the gas is not properly cleaned. Even in concentrations as low as 50 ppm, hydrogen sulfide can cause significant damage over time. It can eat away at engine parts, valves, and gas lines. For more insights, check out this day in the life of an engineer at a biogas facility.
How Carbon Dioxide Content Reduces Efficiency
Carbon dioxide is a major component of raw biogas but doesn't contribute anything to its energy value. This inert gas effectively dilutes the methane content, lowering the overall energy density of your gas. For basic cooking applications, this could just mean slower heating, but for electricity generation or vehicle fuel, it equates to a significant loss in efficiency. Removing CO2 increases the energy content per volume of gas, making storage more efficient and enhancing combustion performance in engines and generators. Learn more about using activated carbon for biogas purification to improve energy efficiency.
What You Need for a Basic Biogas Scrubber

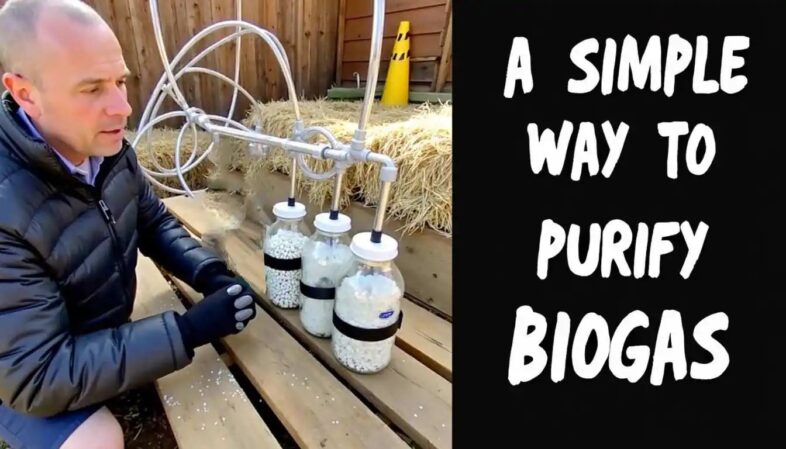
Creating a functional biogas scrubber doesn't necessitate the use of rare materials or specialized machinery. The elegance of a simple scrubbing system is its simplicity – with components that are readily available, you can eliminate the majority of harmful pollutants from your biogas. The system we'll go over uses water scrubbing to reduce CO2 and an iron oxide filter to remove H2S, offering a thorough cleaning method that's within reach for most biogas producers.
Materials You'll Need
Scrubber Basics
• 2-3 plastic containers (5-10 gallon capacity)
• PVC pipes and fittings (1/2″ diameter)
• Rubber stoppers or caps with drilled holes
• Aquarium air stones or diffusers
• Clear vinyl tubing (food-grade, 3/8″ diameter)
• Steel wool or iron oxide pellets
• Silica gel or rice husks (for drying)
• Check valves (one-way valves)
• Hose clamps and waterproof sealant
• Pressure gauge (optional but recommended)
These materials are all you need to create a basic three-stage scrubbing system: a water scrubber to reduce CO2, an iron oxide filter to remove H2S, and a drying stage to remove moisture. For most small to medium-sized biogas setups (producing up to 5m³ per day), these components will do the trick. If you can, try to get transparent or translucent containers. This way, you can check water levels and bubble activity without opening the system.
It's important to pay attention to the quality of the materials you use, especially the tubing. You should use food-grade tubing to avoid contaminating your gas stream. Additionally, if you're using sealants, they should be silicone-based instead of petroleum-based because petroleum-based sealants can break down when they come into contact with the components of biogas. For more information on purification, learn how to use activated carbon for biogas purification.
What You'll Need
Aside from the materials, you'll also need a few basic tools to put together your scrubber system. You will need a drill with various bit sizes for making holes in the lids of the containers and creating mounting points. A pipe cutter or strong scissors will be needed for cutting PVC and tubing, pliers for securing hose clamps, and Teflon tape for making sure the connections are gas-tight. A wrench set will be useful for tightening fittings, and a leak detection solution (soapy water works well) will be necessary for testing the integrity of your system.
How Much Does It Cost?
One of the main reasons to create your own biogas scrubber is the money you’ll save. You can typically put together a basic system for between $50 and $150, depending on the quality of the materials and what you already have on hand. The containers will be your biggest expense, coming in at around $10 to $30 in total. Next, you’ll spend about $15 to $25 on PVC components and fittings. The iron oxide media will cost about $10 to $20, and the tubing, clamps, and valves will add another $15 to $30. In contrast, commercial units start at $500 for very small systems and can quickly cost thousands of dollars for larger systems.
How to Construct a Water Scrubbing System in 5 Easy Steps
Water scrubbing is a straightforward and highly efficient method for initial biogas purification. This process is designed to remove carbon dioxide, which dissolves in water much more readily than methane. By forcing your biogas to bubble through water, you can significantly reduce its CO2 content while also removing some water-soluble impurities such as ammonia. The brilliance of water scrubbing is its simplicity and the use of a plentiful, non-toxic medium.
1. Get Your Containers Ready
Begin with clean plastic containers that can be sealed properly – you can use old water bottles or food-grade buckets. Make two holes in each lid – one for gas to go in and one for gas to come out. The hole for gas to go in should be big enough for your tube coming from your digester or the scrubbing stage before this one. The hole for gas to come out will connect to the next stage or to the final use of the gas. Make sure these holes are a bit smaller than your tube so it fits tightly, and use silicone sealant around the connections to make sure it's sealed tightly for gas.
2. Link the Gas Lines
For the water scrubber phase, the input tube should go almost to the bottom of the container, while the output tube should just go slightly under the lid. This setup makes the gas bubble up through all the water, maximizing the time it is in contact. Install check valves on both the input and output lines to stop water from flowing back into your digester or any later scrubber stages. Use hose clamps to make sure all connections are secure, because the pressure from the biogas can make loose tubes come off.
3. Add Fresh Water
Fill your scrubber about 80% of the way with fresh water. Try to avoid using chlorinated tap water, as it can disrupt the biological processes in your biogas system. Rainwater or well water are both great options. Make sure to leave some room at the top of the scrubber for potential pressure changes. To make your CO2 removal more effective, think about adding a bit of baking soda (sodium bicarbonate) to the water. It can help absorb carbon dioxide through a chemical reaction.
4. Build the Bubble Diffuser
By attaching an aquarium air stone or diffuser to the end of your input tube, you can greatly improve the efficiency of the scrubber. These devices, which are relatively cheap, create smaller bubbles, thus providing more surface area for the gas and water to interact, which in turn improves CO2 absorption. Smaller bubbles also move more slowly through the water column, which increases the amount of contact time. If you can't find a commercial diffuser, you can create a simple one by making multiple small holes in the submerged part of your input tube and covering it with a fine mesh.
5. Leak Testing
Before you start using your scrubber on a regular basis, you should conduct a thorough leak test. Apply a solution of soapy water to all connections and watch for the formation of bubbles, which will indicate that gas is escaping. Make sure to carefully check the seals on the lids and the connections on the tubes. Even small leaks can significantly reduce the efficiency of the system and potentially create safety hazards. Keep in mind that hydrogen sulfide in biogas is toxic, so preventing leaks is essential for both the performance of the system and the safety of the operator.
Use an Iron Oxide Filter to Get Rid of Hydrogen Sulfide
Once you have completed water scrubbing, the next important step is to remove hydrogen sulfide (H2S) from your biogas. This is where an iron oxide filter comes in handy. This filter works by causing a chemical reaction in which iron oxide combines with H2S to create iron sulfide, effectively removing this corrosive compound from your gas stream. A well-designed iron oxide filter can lower H2S levels from hundreds or thousands of parts per million down to levels that are nearly impossible to detect, thereby protecting your equipment from corrosive damage.
Getting Steel Wool Ready
Ordinary steel wool is a great source of iron for your H2S filter. Start by unwinding the steel wool and loosely stuffing it (make sure it's not the kind with soap in it) into your second container. To speed up the oxidation process, lightly mist the steel wool with a vinegar solution, which will encourage rust to form. The rusted steel wool (iron oxide) then reacts with H2S, trapping the sulfur and removing it from your gas stream. Let the steel wool rust for 24-48 hours before hooking it up to your system for the best results. For more on how biogas systems work, check out this article on how much biogas can be produced.
A Better Option: Iron Oxide Pellets
Iron oxide pellets, also known as “iron sponge,” are a more effective and durable alternative to steel wool. These pellets are designed specifically for removing H2S, and they offer a larger surface area and reaction capacity. You can buy them from industrial supply companies or some agricultural suppliers, where they're usually sold as hydrogen sulfide removal media. Even though they're pricier than steel wool, they don't need to be replaced as often, and they remove H2S more consistently.
When you're ready to put your iron oxide pellet filter to use, you'll need to place the media in a container. This container should be similar to your water scrubber, but it won't need any water. At the bottom of the container, put a layer of small stones or mesh. This will keep the pellets from blocking the gas outlet. Make sure the container is sealed off well. You'll need gas-tight connections for the input and output tubes.
Checking for Saturation
Iron oxide media can only absorb so much H2S before it becomes ineffective. When it’s had its fill, it changes color from a reddish-brown to a dark gray or black. When about 70-80% of the media changes color, it’s time to replace it. If your system has a high H2S content, you might want to install a small window or use a clear container so you can easily inspect it without taking the filter apart.
Efficiently Drying Your Biogas
Even after the water scrubbing and H2S removal stages, your biogas will still have some moisture. This can decrease efficiency and potentially harm your equipment. The drying stage is the last purification step in a full biogas cleaning system. Having water vapor in your biogas will not only decrease its energy content but can also condense in pipes and engines, which can cause operational issues. Drying your biogas effectively can increase combustion efficiency by 5-10% and significantly increase the lifespan of your equipment.
The drying process operates on the principle of adsorption – water molecules stick to the surface of drying materials that have a large surface area. Unlike the earlier stages that eliminate particular contaminants, the drying stage only removes water vapor, permitting methane and other gases to pass through unimpeded.
Basic Silica Gel Containers
Silica gel is a great choice for moisture removal and is easy to find in large quantities. To make your own dryer, fill your final container with silica gel beads, but leave about 20% empty at the top for gas to flow. The container should have a gas inlet at the bottom and outlet at the top, so the biogas has to go through all the drying medium. Many silica gel products have color indicators that go from blue to pink when they take in moisture, which is a handy way to know when it's time to replace them. For the best results, arrange the silica gel in a column shape instead of a flat bed to increase the amount of time the gas is in contact.
Economical Cat Litter Option
If you're looking for a more cost-effective drying solution, you can use unscented, clay-based cat litter instead of commercial desiccants. This litter, which is mostly made of bentonite clay, can absorb a lot of water. Fill your drying container with the litter and use small pipes with holes drilled in them to create channels for the gas to flow through. You'll need about 50% more litter than you would silica gel because it's not as efficient at absorbing moisture. Also, you'll need to replace the litter regularly because it doesn't usually come with indicators to show when it's saturated.
Knowing When to Change the Drying Media
The drying media's effectiveness decreases as it absorbs moisture. Silica gel with color indicators provides clear visual cues – replace when approximately 75% of the material has changed color. For materials without indicators like cat litter, establish a regular replacement schedule based on your gas volume – typically every 2-4 weeks for small systems. Weight can also indicate saturation – fully saturated drying media may weigh 20-30% more than fresh material. Some drying media can be regenerated by heating in an oven at 120°C (250°F) for 1-2 hours, though effectiveness gradually decreases after multiple regeneration cycles.
Checking the Quality of Your Purified Biogas
Once you've processed your biogas with a scrubber, it's crucial to make sure it's been properly purified. You don't need any fancy equipment to do this – a few basic tests will give you a good idea of the quality of your gas. Regular testing will help you get the most out of your scrubber and ensure that any equipment you use downstream is safe. For more detailed information on biogas utilization and cleanup, you can check this resource.
When assessing the quality of the biogas, the focus should be on the content of methane (which gives it its energy value), the levels of hydrogen sulfide (which can corrode the equipment), and the moisture content. For more complex systems, measuring the carbon dioxide can also provide additional information on how efficient the scrubbing is.
Easy Flame Test for Methane Percentage
The flame test is a simple way to check the quality of your biogas. When ignited, biogas that has been properly cleaned will produce a steady blue flame, much like natural gas. If the flame is yellow or flickering, there may still be impurities or moisture in the gas.
The color of the flame can give you a rough idea of the methane content – a bright blue flame suggests a higher percentage of methane (70% or more), while a paler blue flame indicates a lower concentration of methane. If you want a more accurate measurement, time how long it takes to boil a standard amount of water and compare it to the time it takes with biogas batches you've tested before.
Using H2S Test Strips for Safety
It is possible to measure the remaining H2S in your cleaned gas affordably with hydrogen sulfide test strips. These strips of paper contain lead acetate, which turns darker when it comes into contact with H2S. The darker the color, the higher the concentration of H2S. To get accurate readings, install a test port after your iron oxide filter and before your dryer.
Most biogas applications require H2S levels to be below 50 ppm, and for sensitive equipment, it needs to be below 10 ppm. If your test shows higher concentrations, it is likely that your iron oxide filter needs to be replaced or your gas flow rate may be too high for effective scrubbing. For more information on purification methods, check out how to use activated carbon for biogas purification.
Keeping Your DIY Scrubber in Tip-Top Shape
Just like any other piece of equipment, your biogas scrubber needs regular maintenance to keep it working at its best. And the better you maintain your system, the cleaner the gas it produces and the longer it lasts. By setting up a regular maintenance schedule, you can avoid unexpected breakdowns and keep your gas purification system running smoothly. For more detailed guidance, you can explore how to use activated carbon for biogas purification.
How often you need to maintain your biogas scrubber depends on how much biogas you produce, what you're using to produce it, and the weather conditions. If your feedstock has a lot of sulfur, you'll need to replace the iron oxide media more often. If the weather is humid, you'll need to change the drying media more often.
Day-to-Day Inspections
Before you start using your scrubber system each day, take a few minutes to visually inspect it. Make sure the water scrubber is filled with water – if it's not, fill it up. The water absorbs CO2 over time and can become saturated. You can check the gas flow through each stage by looking for bubbles in the water scrubber. If your system has pressure gauges, make sure to check those too. Look for any obvious leaks or damage to the containers and connections. These day-to-day inspections should only take 2-3 minutes, but they can prevent major system failures. For more information on effective CO2 absorption, consider learning about the best CO2 separation techniques in the biogas industry.
Weekly Upkeep
Each week, you should perform a more detailed inspection of your scrubber parts. Replace all of the water in your water scrubber – CO2 removal efficiency is greatly reduced by saturated water. To confirm the system is working as it should, use flame tests and H2S test strips to assess the quality of your purified gas. Use soapy water to check all connections for slow leaks that may not be immediately noticeable. Look at the color of the iron oxide media to determine how much capacity is left and check the drying media for signs of saturation. Making small adjustments each week can help you avoid the need for major repairs.
Replacing Components on a Monthly Basis
Filtering media needs to be replaced regularly, depending on how often your system is used. For small to medium-sized systems, the drying media will need to be replaced every three to four weeks. The iron oxide media will last one to three months, depending on the concentration of H2S in your raw biogas. When replacing the media, be sure to clean all containers thoroughly to remove any residue or buildup that could reduce the system's effectiveness. This is also a good time to check for any damaged gaskets, tubing, or valves and replace them if necessary. Keep detailed records of when you replaced components to help you determine the best maintenance schedule for your system. For further insights, you can explore how to use activated carbon for biogas purification.
Common Problems with Biogas Scrubbers and How to Fix Them
Biogas scrubbers can develop problems over time, even if they were designed well. Knowing how to identify and fix common problems can help you keep your biogas system running smoothly. Most problems with scrubbers are related to flow issues, incomplete purification, or structural failures.
When you're trying to figure out what's wrong, it's always best to start with the easiest and most likely problems before moving on to the more complicated ones. This step-by-step method saves you time and keeps you from taking apart parts that are working just fine.
Here are some common things to look for when maintaining your biogas scrubber:
- Are there any visible blockages in the tubing or connections?
- Are the containers properly sealed and not leaking?
- Has the filter media become compacted or channeled?
- Are the check valves functioning properly?
- Is the water pH in the scrubber neutral to slightly alkaline?
Many potential issues can be avoided with regular maintenance and inspection. Keeping a log of any problems that arise can help you identify recurring issues that may indicate a design flaw in your system, which may require more substantial modifications. For more insights, you can explore how to use activated carbon for biogas purification to enhance your system's efficiency.
Problems with Low Gas Flow
When the gas flow through your scrubber system is reduced, the effectiveness of the purification and the availability of gas downstream are greatly affected. The most common causes of this are clogged diffusers in the water scrubber, compacted filter media in the H2S removal stage, or water condensation blocking the lines. Start by checking the easiest access points, which are usually the input and output connections, before you start taking apart components. If the diffuser in the water scrubber is clogged, soak it in a vinegar solution to dissolve the mineral deposits. If the filter media is compacted, gently break it up or replace it completely if it's near the end of its life. You might want to think about installing moisture traps at low points in your gas lines to stop water from building up.
Unpleasant Sulfur Odor
If you notice a foul smell similar to rotten eggs in your purified gas, it's a sign that hydrogen sulfide is slipping through your scrubber system. This usually means your iron oxide media is saturated and can no longer effectively remove H2S. You should replace the iron oxide media right away, as H2S can rapidly damage equipment downstream.
If the issue persists even after replacing the media, look for “channeling” in your filter container – this is when the gas finds the path of least resistance through the media instead of distributing evenly. This issue can be fixed by adding baffles or redistributing the media more loosely. If your system has a particularly high H2S content, you may want to consider adding a second iron oxide filter in series for more thorough removal. For additional purification methods, you can explore using activated carbon for biogas purification.
Signs of Water Contamination
Water contamination may be present in downstream components due to issues with your drying stage or system configuration. You can identify water contamination by looking for water droplets in tubing after the drying container, condensation in gas storage, or bubbling sounds in equipment.
To address this issue, first ensure that your drying media is not saturated and replace it if necessary. Then, look for low points in your system where water might collect – it's best if all gas lines maintain a slight upward slope whenever possible. If you're still having issues with condensation, you may want to install additional water traps at key points. If the issue is severe, you might consider cooling the gas before it enters the drying stage. This can help remove moisture more effectively by causing condensation before the drying media.
When to Replace Your Filter
Figuring out the best time to replace your filter media is a balancing act between how well it purifies and how much it costs. Instead of just going by what you see, keep track of how your system performs over time to see if there are any patterns. Take note of when you start to smell H2S or when your test strips show it's present, or when your system isn't drying as well (you'll see condensation downstream).
But don't just go by the calendar – go by how much gas you're producing. For instance, you might find that you need to replace your iron oxide media after it's processed 50m³ of biogas, not just every month. That way, you can figure out the best times to replace your media based on what your biogas is made of and how much you're producing.
Adjusting Your System for Various Biogas Volumes
One of the best things about DIY biogas scrubbers is that they can be scaled up or down – the same basic principles apply whether you're dealing with a small or large system, you just need to tweak a few things. The main thing you need to consider when scaling is residence time – this is how long the gas is in contact with each purification medium.
If you're dealing with larger gas volumes, you'll need to use larger containers or multiple parallel units to ensure the gas is in contact with the purification medium for long enough to be effectively purified. For more detailed information, you can refer to this anaerobic digestion and biogas cleanup guide.
As you expand your system, it's usually more effective to add more units rather than just making each part bigger. This modular strategy boosts dependability by enabling partial operation during upkeep and provides adaptability to manage changing gas production rates. For insights into how modular systems are implemented, you might explore a case study of a biogas plant at a large university.
Small Household Setup (1-2m³/day)
A single-train scrubber system using 5-gallon containers is a good fit for a typical household biodigester producing 1-2 cubic meters of biogas daily. This size is enough to meet the cooking needs of a family of 4-6 people. Each stage has enough medium for 1-2 weeks of operation before it needs maintenance.
Water scrubbers of this size usually use 3-4 gallons of water. H2S filters have 2-3 pounds of iron oxide media. This system can fit in a small 3×2 foot area. It usually costs $50-100 for materials. To make it work better, you could add a small biogas storage bag or container after the purification system. This would help even out the supply and demand.
Mid-Sized Farm Operation (5-10m³/day)
For a mid-sized farm operation that produces 5-10m³/day, you’ll need bigger components or several units working in tandem. You’ll likely use 30-55 gallon drums in place of smaller containers, with multiple filter units being fed at the same time by distribution manifolds. This larger system can be used for cooking, heating, and even small-scale electricity production with a biogas generator.
Water scrubbers at this scale usually need the water changed every 3-4 days, while iron oxide media may need to be replaced weekly depending on the H2S levels. You might want to think about adding pressure regulation and monitoring equipment for more reliable performance, especially if you’re powering sensitive equipment like generators.
When using water scrubbing, it's best to use a series of containers for optimal CO2 removal.
Set up H2S filters in parallel so you can isolate them for maintenance without having to shut everything down.
Install pressure gauges between stages to keep an eye on flow restrictions.
Think about using automated water exchange systems for the scrubber stage.
Make sure to include safety releases and backflow prevention throughout the system.
When you're working with systems of this size, you'll start to see the benefits of using professional components. It might be a good idea to invest in purpose-built filter housings and high-capacity drying media. This can help cut down on how often you need to do maintenance and make everything more reliable.
There are also economic advantages that become more noticeable as the scale increases – a well-kept medium-sized system can save you $50-150 per month in energy costs, depending on local energy prices and how efficiently you use it.
Your Cleaned Biogas is Ready to Use
Once your biogas has gone through the entire scrubbing system, it primarily contains methane (80-95%) with small amounts of nitrogen and residual carbon dioxide. This cleaned gas has a higher energy content, burns more efficiently, and is significantly less dangerous to your equipment than raw biogas.
The increased concentration of methane means you'll need less volume for the same energy output, and combustion will produce fewer problematic byproducts. Most importantly, your engines, generators, and appliances will operate longer with less maintenance when supplied with properly scrubbed biogas.
Keep in mind that biogas, even when purified, is highly flammable and should be handled with the necessary safety measures. When using biogas indoors, always make sure there is adequate ventilation, and install suitable flame arrestors in your lines. You may also want to add a small quantity of artificial odorant (like the ones used in commercial natural gas) to make leaks easier to detect if your system eliminates too much of the natural hydrogen sulfide smell.
Questions You May Have
These are the questions that most people who are new to using biogas purification systems tend to ask. Knowing the answers to these questions will help you to use your scrubber more effectively and safely.
1. How often should I replace the water in my scrubber?
The water in your scrubber should be replaced when it becomes saturated with carbon dioxide, usually signaled by a decrease in bubbling activity and a faint acidic odor. For small home systems, this usually means replacing the water every 3-7 days, depending on the rate of gas flow. Larger systems or those with a higher CO2 content may need to have their water replaced more often.
Adding a small amount of baking soda (sodium bicarbonate) to your scrubber water can prolong its usefulness by neutralizing the carbonic acid that forms when CO2 dissolves. Some operators use water pH as a gauge – when the pH falls below 6.5, it's time to replace the water.
2. Is my purified biogas compatible with all gas appliances?
Once your biogas is thoroughly scrubbed, it can be used in the majority of natural gas appliances. However, you will need to make some adjustments to compensate for the slightly different combustion characteristics. Usually, appliances will need jet replacements with larger orifices because biogas has a lower energy density than commercial natural gas, even when it's been purified. Most stoves, water heaters, and generators that are designed for natural gas can be adapted for biogas use.
However, if the appliance is a sophisticated one with electronic controls, you may need to have it professionally modified. You should always check with the manufacturer of the appliance before making any modifications because if you do it wrong, you could void the warranty and create a safety hazard.
Biogas can be used directly for cooking with minimal modification. Simple atmospheric burners are the most forgiving with variable gas quality. For heating applications and internal combustion engines, more consistent gas quality and additional purification steps may be necessary.
3. What safety measures should I consider when using a biogas scrubber?
Using a biogas scrubber system demands several safety precautions. Firstly, never place your scrubber system inside or in areas with poor ventilation, as leaked biogas can pose asphyxiation or explosion risks. Do not operate in or near enclosed spaces. Installing methane detectors near your system must never be the first line of protection. Always use passive measures to ensure safety against H2S gas build-up and explosion risks.
Always incorporate water traps and check valves to avoid unexpected gas flow reversals.
When you're replacing filter media, especially exhausted iron oxide material, make sure to wear gloves and work in areas with good ventilation, as the used media can contain toxic compounds.
Never smoke or create ignition sources near your biogas system, and clearly label all components with appropriate warning labels to alert others to the presence of flammable gas.
4. How do I know if my scrubber is removing enough hydrogen sulfide?
It is important to remove hydrogen sulfide effectively to ensure the longevity and safety of your equipment. The easiest way to assess this is by using H2S test strips. These strips provide a semi-quantitative measurement of the remaining H2S. For most applications, levels below 50 ppm are acceptable. However, for sensitive equipment such as fuel cells, levels may need to be below 10 ppm.
H2S Concentration Effects
• 1-10 ppm: Detectable odor, minimal equipment impact
• 10-50 ppm: Strong odor, slow corrosion of equipment
• 50-200 ppm: Very strong odor, rapid equipment damage
• 200+ ppm: Extremely hazardous, immediate equipment damage
• 500+ ppm: Potentially lethal concentration in enclosed spaces
In the absence of test strips, copper exposure tests can provide a rough estimate. Place a polished copper strip or penny in the gas stream after your scrubber – any darkening or tarnishing within 24 hours indicates significant remaining H2S. The more rapid and extensive the darkening, the higher the H2S concentration. This method is qualitative but provides a useful indication when more precise measurement tools aren't available. For more detailed techniques, you might explore using activated carbon for biogas purification.
Should your system consistently display elevated H2S levels following scrubbing, you might want to think about incorporating an additional iron oxide filter in series or decreasing the gas flow rate to extend the contact period with the filtering media. The efficiency of the system significantly enhances when the gas residence duration in the filter is increased. For more information on improving biogas purification, consider learning about using activated carbon in your system.
If your application is crucial, you may want to consider spending money on a digital H2S analyzer. These devices can give you accurate readings and track trends over time. Basic models start at around $200, but they offer invaluable data to help you get the most out of your system.
5. Can I store purified biogas for later use?
Yes, you can store purified biogas for later use. Purified biogas is much safer and more effective to store than raw biogas. This is because the removal of hydrogen sulfide and moisture significantly reduces the corrosion and degradation of most storage containers. For small systems, the easiest storage solution is to use flexible gas bags made from PVC or other gas-impermeable materials.
These bags typically hold 1-5m³ of gas under low pressure (0.5-5 kPa). You can buy these bags commercially or make them from appropriate materials.
Medium-sized systems can use repurposed propane tanks to store larger volumes under moderate pressure (50-100 kPa), but this requires additional compression equipment and stringent safety measures. These higher-pressure systems must include appropriate pressure relief valves, regulators, and moisture separators to operate safely.
Always remember that compressed biogas, like any flammable gas, poses significant safety risks if improperly handled. For more insights, explore how to use activated carbon for biogas purification to enhance safety and efficiency.
When you're storing purified biogas, make sure you place the storage containers in a well-ventilated area outside or away from anything that could ignite it. If you're using flexible storage, keep it out of direct sunlight and safe from physical damage.
Also, make sure to regularly check that all connections are gas-tight. If you purify and store biogas properly, it can be a reliable energy source that you can use on demand, instead of a resource that you use once and then lose. For more insights on biogas storage and management, you can explore the daily operations at a biogas facility.