
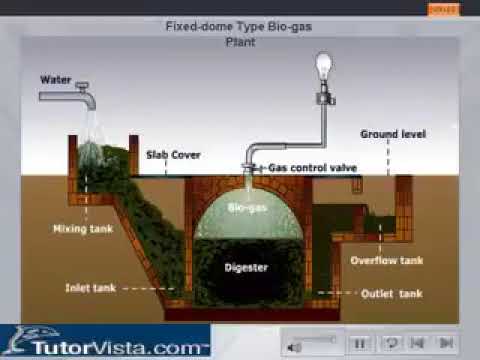
A fixed-dome biogas plant is an underground, masonry-built digester with a rigid dome-shaped roof that provides storage for biogas from the anaerobic digestion of organic waste, such as animal manure and human detritus. As organic matter ferments, gas bubbles up into the dome, exerting pressure that forces the digested slurry into a separate overflow tank.
This cost-effective and low-maintenance system provides a sustainable energy source for cooking and heating, and the nutrient-rich slurry can be used as organic fertiliser, yet in many nations, this form of construction is not permitted!
Fixed Dome Biogas Plant – Key Takeaways
- Fixed dome biogas plants provide a sustainable, long-term renewable energy solution with typical lifespans of 20+ years when properly constructed and maintained.
- The underground design of fixed dome digesters creates natural pressure for gas distribution while saving valuable surface space and providing temperature stability.
- Proper site selection considering soil conditions, distance from buildings, and temperature factors is crucial for optimal biogas production.
- Sizing your biogas plant correctly based on available feedstock and household energy needs ensures efficient operation and prevents wasted resources.
- The construction process requires careful attention to waterproofing and sealing to prevent gas leakage and maintain system efficiency.
Sustainable energy production doesn't have to be complex or expensive. Fixed dome biogas plants represent one of the most reliable, low-maintenance renewable energy technologies available today, converting organic waste into valuable cooking fuel and high-quality fertiliser.

Why Fixed Dome Biogas Plants Are The Best Renewable Energy Investment For Low-Regulated Developing Nations
Fixed dome biogas plants thrive in developing regions where energy infrastructure is limited and regulatory hurdles are minimal. These systems require no electricity to operate, function with locally available materials, and can be constructed using skills present in most communities.
The underground design withstands extreme weather conditions while maintaining the consistent temperatures necessary for anaerobic digestion. Most importantly, these plants convert readily available agricultural waste and animal manure—often environmental pollutants—into clean cooking fuel that replaces expensive propane or environmentally destructive firewood collection.
The economic case is equally compelling. With construction costs ranging from $500-1500 USD for family-sized units, fixed dome digesters typically pay for themselves within 2-3 years through fuel savings alone.
The additional benefit of nutrient-rich fertiliser production further accelerates the return on investment for farmers. Unlike solar or wind systems that require specialised components, approximately 90% of a fixed dome biogas plant can be constructed using locally sourced materials, stimulating local economies rather than requiring expensive imports.

“Fixed dome type biogas plant schematic diagram – YouTube” from www.youtube.com and used with no modifications.
Why Fixed Dome Biogas Plants Are Not Built in Europe
Fixed dome biogas plants, while popular in developing nations due to their low cost and simple construction, are virtually absent from the European landscape. This absence is primarily driven by stringent environmental regulations and practical maintenance concerns that make these underground structures incompatible with European standards.
The absence of fixed dome biogas plants in Europe reflects a fundamental commitment to protecting groundwater resources for perpetuity.
While these systems may function adequately in regions with different regulatory frameworks, the combination of strict legal requirements under the Groundwater Directive and the practical impossibility of proper inspection and leak repair makes them unsuitable for European deployment.
The higher upfront investment in above-ground, inspectable and the provision of impermeable bunding to capture all emergency spillage is considered a necessary cost for ensuring environmental protection and intergenerational equity in resource management.
The colder climate throughout much of Europe necessitates supplemental heating systems to maintain optimal digestion temperatures, compromising the energy efficiency equation. Additionally, European labour costs for the skilled masonry work required make the economics less favourable compared to prefabricated commercial biogas systems.
Modern European waste management systems also create feedstock availability challenges. Municipal sewage collection and centralised waste management remove potential biogas inputs from individual households. The seasonal temperature fluctuations across Europe further complicate year-round operation, often requiring expensive insulation solutions.
These combined factors explain why Europe has embraced industrial-scale biogas facilities rather than household fixed dome systems common in tropical and subtropical regions.

“Construction of Fixed-Dome Digester …” from www.kenpro.org and used with no modifications.
The Anatomy of a Fixed Dome Biogas Plant
A fixed dome biogas plant operates on simple but elegant principles of anaerobic digestion. The system consists of an underground fermentation chamber where bacteria break down organic matter in the absence of oxygen.
As decomposition occurs, biogas (primarily methane) rises and collects in the dome, creating pressure that forces the digested slurry into a compensation tank.
This hydraulic pressure system eliminates the need for moving parts or mechanical pumps, contributing to the remarkable longevity of these systems, with many operating efficiently for 20+ years with minimal maintenance.
Main Components That Power Your System
Every fixed dome biogas plant consists of six essential components working in harmony. The inlet pipe serves as the entry point for organic waste mixed with water, directing the slurry into the main digestion chamber.
The underground digestion chamber, typically constructed of brick or concrete, provides the oxygen-free environment where anaerobic bacteria thrive. Above this chamber sits the fixed dome itself – the defining feature that collects and stores the produced biogas under pressure. For more detailed information on the construction of fixed dome digesters, visit this comprehensive guide.
The outlet chamber receives displaced slurry as gas production creates pressure within the system. This component serves as both a pressure regulation mechanism and provides easy access to the nutrient-rich biofertilizer.
The gas outlet pipe, equipped with moisture traps and safety valves, channels the biogas to its point of use. Finally, a mixing tank at the inlet allows for proper preparation of the organic material before it enters the digestion chamber, ensuring optimal consistency for bacterial decomposition.
The simplicity of this design eliminates many potential failure points found in more complex biogas systems. With no moving parts, electrical components, or mechanical seals to fail, fixed dome plants offer remarkable reliability in rural settings where technical support may be limited.
The integrated pressure system also eliminates the need for gas pumps or compressors, further simplifying operation and maintenance.
- Inlet pipe and mixing tank for feedstock preparation and introduction
- Main digestion chamber, where anaerobic decomposition occurs
- Fixed dome for biogas collection and pressure generation
- Outlet chamber for displaced slurry and fertiliser collection
- Gas pipeline with safety valves for biogas transmission
- Optional slurry storage area for processed biofertilizer
How Gas Production and Storage Work Together
The genius of fixed dome design lies in its integrated production and storage capabilities. As organic material decomposes in the digestion chamber, methane and other gases rise naturally to collect in the dome. This accumulation creates increasing pressure that automatically pushes digestate into the expansion chamber.
The system essentially functions as a natural gas compressor, with pressure directly proportional to the volume of gas stored. When gas is consumed – such as during cooking – the pressure decreases and slurry flows back from the expansion chamber into the main digester, maintaining the hydraulic balance.
“fixed-dome biogas plant – YouTube” from www.youtube.com and used with no modifications.
Underground vs. Above-Ground Installation Options
The traditional fixed dome biogas plant is installed completely underground for several compelling reasons. Soil provides free insulation, maintaining stable temperatures crucial for bacterial activity. The surrounding earth also supports the structural integrity of the dome, allowing for simplified construction techniques.
Underground installation protects the system from physical damage, temperature extremes, and maximises available land use – particularly valuable in densely populated rural areas.
The earth covering also provides additional safety by containing any potential gas leaks and preventing direct sun exposure that could damage construction materials over time. For more information on the construction of fixed dome digesters, check out this detailed guide.
Choosing the Perfect Location for Maximum Output
Location selection can make or break your biogas plant's performance. The ideal site balances multiple factors: proximity to both feedstock sources and gas usage points, appropriate soil conditions, sufficient distance from sensitive water sources, and protection from flooding.
The plant should be situated to avoid areas with high groundwater tables that could compromise the structure. For household systems, positioning the plant within 20-30 meters of the kitchen minimises gas pressure losses through piping while maintaining safe separation from living spaces.
Location Selection Checklist
✓ Minimum 10m distance from drinking water sources
✓ Higher elevation than surrounding areas to prevent flooding
✓ Stable, non-rocky soil for easier excavation and structural support
✓ Close proximity to feedstock sources (animal pens, kitchens)
✓ Sufficient distance from large tree roots (minimum 5m)
✓ Accessible for construction equipment and future maintenance
✓ Good exposure to sunlight in cold climates
✓ Protected from strong winds that could affect gas appliance flames
Soil Conditions That Support Long-Term Stability
The foundation of a successful biogas plant begins with the ground beneath it. Ideal soil conditions include well-draining clay or loam with minimal rock content. These soil types provide natural structural support while being relatively easy to excavate.
Sandy soils may require additional reinforcement to prevent structural movement, while rocky terrain significantly increases construction complexity and costs. Before committing to a location, conduct simple percolation tests by digging a 1-meter hole, filling it with water, and observing drainage patterns – excessive water retention indicates potential problems.
Soil stability directly impacts the longevity of your biogas system. Areas with high erosion risk or expansive soils that dramatically change volume with moisture content should be avoided. If construction in less-than-ideal soil is unavoidable, consider reinforcing the excavation with additional concrete work or stabilising materials.
Remember that the weight of a water-filled digester exerts considerable pressure on surrounding soil – unstable ground conditions can lead to settling, cracking, and eventual system failure. For more information on the importance of soil stability, you can read about anaerobic processes and their impact on biogas systems.
Distance Requirements from Buildings and Water Sources
Safety and environmental protection dictate minimum distance requirements for biogas plant placement. Maintain adequate separation from any drinking water source, including wells, springs, or boreholes, to prevent potential contamination. Some suggest at least 10 meters from any source, but in permeable ground larger separation may be essential.
The plant should be located at least 5 meters from building foundations to prevent structural impacts from excavation and moisture changes. In regions with freezing temperatures, position the plant on the south-facing side of buildings when possible to benefit from thermal mass and sun exposure.
Local regulations may impose additional requirements, particularly regarding proximity to property lines, public waterways, or protected environmental areas. Always verify these regulations before beginning construction. While keeping the plant reasonably close to the point of gas use reduces pipeline costs and pressure losses, never compromise on safety distances to achieve convenience.

“Fixed Dome Biogas Digester” from www.biogassa.co.za and used with no modifications.
Temperature Considerations for Optimal Digestion
Microbial activity within your biogas digester is highly temperature-dependent. Optimal gas production occurs in the mesophilic range (30-40°C/86-104°F), with production rates dropping significantly below 15°C/59°F. In tropical and subtropical regions, underground installation provides sufficient temperature stability.
For temperate climates, consider adding solar heating elements, constructing a greenhouse over the inlet/outlet chambers, or implementing a water-jacket heating system using excess biogas.
The digester's depth also influences temperature stability – deeper installations experience less temperature fluctuation. In colder regions, increasing the standard 2-3 meter depth to 3-4 meters can provide significant thermal advantages.
The plant's orientation relative to sun exposure becomes critical in non-tropical locations; maximise southern exposure (northern hemisphere) or northern exposure (southern hemisphere) for natural solar heating benefits.
Accessibility for Maintenance and Feeding
Even the most well-designed biogas plant requires regular feeding and occasional maintenance. Position your plant where daily access is convenient, regardless of weather conditions. The feeding inlet should be easily accessible from areas where organic waste is generated – typically near kitchens or animal housing.
Consider seasonal factors like monsoon flooding or snow accumulation that might temporarily restrict access to certain areas of your property.
Maintenance accessibility is equally important. Ensure sufficient workspace around the inlet and outlet chambers for occasional cleaning operations.
The gas pipe connection point needs protection from physical damage while remaining accessible for pressure checks and potential repairs. If incorporating a gas storage system or pressure regulators, these components require regular inspection and should be positioned for easy access.
Size and Capacity Planning Made Simple
Proper sizing of your biogas plant is crucial for balancing investment costs against energy production. Undersized plants fail to meet energy needs, while oversized systems represent wasted resources.
The primary determinants of appropriate plant size include available feedstock volume, desired gas output, and climate conditions. In tropical regions, a family of four typically requires a 4-6 cubic meter digester volume, which produces sufficient gas for daily cooking needs when fed with waste from 2-3 cattle or equivalent organic material.
For those interested in maximising efficiency, exploring biogas yield analysis can provide valuable insights.
Calculate Your Biogas Needs Based on Household Size
Biogas requirements depend directly on your specific energy applications. For cooking purposes, each family member requires approximately 0.2-0.3 cubic meters of biogas daily. A standard single-burner stove consumes roughly 0.2-0.4 cubic meters per hour of operation.
Lighting applications use considerably less – about 0.1-0.15 cubic meters per lamp per hour. When planning capacity, always account for peak usage periods when multiple applications might operate simultaneously. For more detailed guidance, you can refer to this biogas construction manual.
Beyond cooking and lighting, consider any additional applications you plan to implement. Water heating requires approximately 0.3-0.5 cubic meters per person daily.
Small biogas generators typically consume 0.5-0.7 cubic meters per kilowatt-hour of electricity produced. Always build in a capacity buffer of 15-20% above your calculated needs to accommodate seasonal variations in gas production and potential future expansion of usage.
Matching Digester Volume to Available Feedstock
Your biogas production is ultimately limited by available organic inputs. As a general rule, each kilogram of dry organic matter produces approximately 0.2-0.4 cubic meters of biogas.
Different feedstocks yield varying gas volumes – cattle manure produces approximately 0.04-0.06 cubic meters per kg of fresh manure, while food waste can yield 0.05-0.09 cubic meters per kg. For sustained production, ensure your daily available feedstock matches your digester's design capacity.
| Feedstock Type | Biogas Yield (m³/kg fresh material) | Required Daily Input for 1m³ Biogas |
|---|---|---|
| Cattle Manure | 0.04-0.06 | 16-25 kg |
| Pig Manure | 0.06-0.08 | 12-17 kg |
| Chicken Manure | 0.07-0.10 | 10-14 kg |
| Food Waste | 0.05-0.09 | 11-20 kg |
| Crop Residues | 0.03-0.05 | 20-33 kg |
The digester's hydraulic retention time (HRT) – the average time material remains inside the digester – also influences sizing decisions. Optimal HRT ranges from 30-60 days, depending on temperature and feedstock type.
In warmer climates where bacterial activity is higher, shorter retention times are possible. Calculate your digester's working volume by multiplying daily input volume (including dilution water) by the desired retention time. For example, if you feed 50 litres of slurry daily with a 40-day retention time, your working digester volume should be approximately 2,000 litres (2 cubic meters). To maximise your biogas production, consider following the best practices for biogas yield analysis.
Future-Proofing: When to Build Bigger Than Current Needs
Construction of a fixed dome biogas plant represents a long-term infrastructure investment. While precise sizing maximises efficiency, consider potential future needs when finalising dimensions. Family growth, additional livestock acquisition, or expanding gas applications may all increase future demand.
The incremental cost of building 15-25% larger during initial construction is significantly lower than attempting to expand an existing system later. However, avoid extreme oversizing as digesters operating well below capacity may experience reduced gas pressure and biological inefficiencies.
If substantial uncertainty exists regarding future needs, consider implementing a modular approach where multiple smaller digesters can be constructed sequentially as demand grows.
This approach allows for spreading investment costs over time while maintaining operational efficiency. Another future-proofing strategy involves designing for potential supplemental heating additions even if not immediately implemented – this ensures the option remains viable if climate considerations change.

“Biogas Plant Fixed Dome Storage at best …” from www.indiamart.com and used with no modifications.
Materials You'll Need for Construction
Quality materials directly determine your biogas plant's durability, efficiency, and maintenance requirements. Investing in proper construction materials pays dividends through extended system life and reduced repair needs.
The primary construction components include structural materials for the digester and dome, piping for gas and slurry transport, waterproofing compounds, and specialised fittings for gas control.
Concrete and Brick Requirements for Different Plant Sizes
The digester chamber and dome represent the largest material requirements. For a standard 6 cubic meter family-sized plant, expect to use approximately 1,000-1,200 bricks (depending on size) for the digester walls and dome construction.
Additionally, you'll need about 10-12 bags (50kg each) of Portland cement for making concrete and mortar. Approximately 0.5 cubic meters of sand and 0.8 cubic meters of aggregate (gravel) complete the basic structural material requirements.
Pipe Fittings and Gas Control Components
Gas management components require special consideration due to safety implications. You'll need approximately 8-10 meters of PVC pipe (4-inch diameter) for the inlet and outlet connections.
The gas pipeline requires 15-20 meters of 0.5-inch galvanised iron pipe or specialised biogas hosing – never use standard PVC for gas lines as methane causes deterioration over time. Include a minimum of one main gas valve, a water trap for moisture removal, and a simple pressure gauge in your materials list.
Several specialised components improve safety and functionality. A flame arrester prevents flashback into the gas system and costs approximately $15-30 in India, depending on quality.
A hydrogen sulphide filter (using iron oxide or steel wool replaced regularly) reduces corrosion and unpleasant odours.
For cooking applications, specific biogas burners designed to accommodate the lower pressure characteristics of biogas perform significantly better than modified LPG appliances.
These specialised burners typically cost $20-40 but dramatically improve combustion efficiency.
Waterproofing Materials for Leak Prevention
Effective waterproofing represents the difference between a high-performing biogas system and a frustrating failure. For internal dome waterproofing, acquire 15-20 kilograms of cement waterproofing compound or 8-10 litres of liquid concrete sealer.
Additional materials should include a waterproof cement additive for the final plaster layer and approximately 4-5 square meters of waterproofing membrane for external dome protection. Silicone sealant for pipe penetrations and expansion joint sealer completes your waterproofing arsenal.
In regions with high water tables, supplemental external waterproofing becomes essential. Additional materials in these situations should include bituminous coating for exterior surfaces and bentonite clay for particularly challenging conditions.
The modest additional cost of comprehensive waterproofing (typically adding 5-8% to total material costs) pays tremendous dividends in system longevity and performance reliability.
Tools and Equipment Checklist
Proper tools ensure efficient construction and structural integrity. Basic masonry tools include trowels (pointing and finishing), spirit levels, plumb bobs, measuring tapes, and a builder's square. For excavation, you'll need shovels, picks, and wheelbarrows.
Formwork for the dome requires wooden planks and supports, while concrete work necessitates mixing containers, a tamping rod, and finishing trowels.
Specialised equipment includes a pipe wrench for gas connections, Teflon tape for gas-tight joints, and pressure testing equipment for verifying system integrity.
- Measuring and layout tools: tape measure, marking string, stakes, spirit level
- Excavation equipment: shovels, picks, mattocks, wheelbarrows
- Masonry tools: brick trowels, pointing trowels, buckets, mixing pans
- Concrete work: tamping rod, floats, edging tools, screeds
- Plumbing tools: pipe wrenches, pipe cutters, and threading dies for gas pipes
- Safety equipment: gloves, safety glasses, dust masks, first aid kit
- Testing equipment: pressure gauge, soapy water for leak detection
Step-by-Step Construction Guide
Building a fixed dome biogas plant requires methodical progression through several distinct construction phases. While individual techniques may vary slightly based on local materials and practices, following a systematic approach ensures structural integrity and operational efficiency.
The entire construction process typically requires 3-4 weeks, including curing time for concrete and masonry elements. Meticulous attention to detail during each phase prevents costly remediation later.
Important: This guide is a compilation of a number of source guides for completeness. Always refer to the original published guides before taking any action.
Local construction regulations vary. Always refer to local regulations before taking any action.
1. Excavation and Foundation Preparation
Begin by marking the exact dimensions of your digester using stakes and string. For a standard 6 cubic meter plant, excavate a circular pit approximately 2.5 meters in diameter and 2 meters deep. The foundation begins with a 10-15 cm layer of compacted gravel for drainage, followed by a concrete foundation 10-15 cm thick.
This foundation should extend 15-20 cm beyond the planned wall dimensions to provide a stable base. Allow the concrete foundation to cure for at least 48 hours before proceeding with wall construction.
Proper excavation techniques prevent future structural problems. Ensure vertical walls with slight inward tapering (5-10 degrees) to resist soil pressure after construction. In areas with high water tables, install a drainage system around the foundation perimeter using perforated pipe and gravel.
For expansive soil conditions, consider a thicker foundation (15-20 cm) with additional steel reinforcement to prevent cracking during seasonal ground movement.
2. Building the Digester Chamber Walls
Construct the cylindrical digester walls using bricks or concrete blocks laid in a running bond pattern for maximum strength. Each course should be carefully levelled and plumbed to ensure structural integrity.
The standard wall thickness of 23 cm (double brick) provides adequate strength while minimising material usage. Incorporate the inlet and outlet pipe sleeves during wall construction rather than cutting openings later – this provides superior structural integration and leak prevention. For more detailed guidance, you can refer to the construction of fixed dome digester chambers.
After completing approximately half the wall height, apply the first coat of cement plaster (1:3 cement-sand ratio) to the interior surfaces. This initial coating helps identify and address any structural irregularities before they become inaccessible.
Continue wall construction to the designed height, typically 1.5-1.7 meters for a 6 cubic meter digester. The final courses should begin tapering inward to prepare for dome construction, creating a “shoulder” that helps support the dome structure.
3. Constructing the Perfect Dome
The dome represents the most technically challenging aspect of construction. Begin by building a temporary earthen form inside the digester that exactly matches the desired dome curvature.
Compact this form thoroughly to prevent settling during construction. Next, build the gas outlet pipe into the centre of the dome with a removable extension pipe for guiding the dome apex. Lay bricks in concentric circles starting from the outer edge, using a gauge rod pivoted at the centre to maintain consistent curvature.
Each brick should be carefully mortared with a stronger mix (1:2 cement-sand ratio) than used for the walls. As the dome progresses inward, the brick angles become increasingly horizontal – careful placement and adequate mortar are essential.
The central portion requires specially cut bricks to maintain the curvature and provide a secure closure. After completing the dome structure, apply multiple layers of cement plaster to the exterior, incorporating waterproofing compounds in each layer. Allow a minimum of 7-10 days curing time before removing the internal earthen form.
4. Installing Inlet and Outlet Chambers
The inlet chamber facilitates convenient feeding and proper slurry preparation. Construct this chamber with a minimum volume of 0.6 cubic meters (for a 6 cubic meter plant), using brick or concrete walls.
The chamber should include a mixing zone where water and organic materials combine before entering the main digester. The inlet pipe connection requires a minimum 30-degree downward angle to prevent clogging and facilitate gravity flow. Complete the chamber with a removable concrete cover that prevents rainwater intrusion while allowing easy access.
The outlet or expansion chamber serves as both a pressure regulation system and a fertiliser collection point. This chamber should have a volume of approximately 20-30% of the main digester capacity to accommodate displaced slurry during maximum gas production.
Construct using the same materials as the inlet chamber, ensuring the connecting pipe enters below the expected slurry level to prevent gas escape. Like the inlet, this chamber requires a secure but removable cover for access. Both chambers should receive interior and exterior waterproofing treatments identical to the main digester.
5. Finishing the Gas Collection System
The gas collection and distribution system begins at the dome's apex with the main gas outlet pipe. This galvanised iron pipe (minimum 0.5-inch diameter) should extend vertically from the dome through a water trap designed to prevent backflow.
Install the main gas valve immediately after the water trap, followed by a simple pressure gauge for monitoring system performance. All threaded connections require gas-appropriate sealant or Teflon tape specifically rated for methane applications.
Continue the gas line to its point of use, installing additional safety components as needed. A hydrogen sulfide filter using iron oxide removes corrosive elements, while a flame arrester prevents flashback risks.
For longer pipelines, incorporate condensate traps every 20-30 meters to collect moisture that could otherwise block gas flow. Complete the system with appropriate fittings for your specific applications – typically specialised biogas burners for cooking or lighting.
Test all connections with soapy water to identify and repair any leaks before commissioning the system.
“Fixed Dome Type Biogas Plant – Complete …” from rkwindmast.com and used with no modifications.
Waterproofing and Sealing Your Plant
Effective waterproofing represents perhaps the single most important factor in long-term system performance. A biogas plant must be waterproof from the outside to prevent groundwater infiltration and gas-tight from the inside to prevent methane leakage.
Begin waterproofing during initial construction by incorporating waterproofing compounds into all concrete and mortar mixes.
Apply specialised cement-based waterproofing slurry to all interior surfaces in multiple thin layers, ensuring each layer properly cures before applying the next.
Critical Areas Where Leaks Commonly Occur
Certain locations require extra waterproofing attention to prevent system failure. The dome/wall junction experiences significant stress during operation and represents the most common leak point.
Apply additional waterproofing layers at this junction, potentially incorporating reinforcing mesh between layers for added strength. Pipe penetrations through walls require special treatment – use purpose-designed water stops or sleeves with flexible waterproof sealant to accommodate minor movement while maintaining water-tightness.
The foundation-wall junction creates another vulnerable area where groundwater can infiltrate. Install a proper waterstop at this connection and apply additional waterproofing extending at least 30 cm up the walls and across the foundation.
The central dome section, where bricks meet at challenging angles, needs meticulous mortaring followed by multiple waterproofing layers.
Finally, any construction joints where work was interrupted require thorough cleaning and appropriate joint treatment before waterproofing application.
Best Waterproofing Methods for Different Climate Zones
Waterproofing approaches must adapt to local climate conditions for maximum effectiveness. In tropical regions with high rainfall, emphasise external waterproofing using bituminous coatings or membranes on all underground surfaces.
Apply these waterproofing layers after the concrete has fully cured but before backfilling. For arid regions, focus more on internal waterproofing to prevent gas escape, using cement-based crystalline waterproofing that penetrates concrete and permanently blocks pores and capillaries.
Cold climates present unique challenges, including freeze-thaw cycles that can damage conventional waterproofing. In these regions, consider elastomeric membranes that maintain flexibility at low temperatures.
Areas with high groundwater tables may require bentonite clay applications around external surfaces – this natural material expands when wet to form an impermeable barrier. Regardless of climate, always include drainage provisions to direct groundwater away from the structure rather than relying solely on waterproofing to resist hydrostatic pressure.
Testing for Gas-Tightness Before Final Closure
Before completing construction and removing access to internal surfaces, conduct thorough gas-tightness testing. A simple but effective method involves filling the chamber with water to different levels and marking the levels.
Monitor these levels over 24-48 hours – any significant change indicates leakage. For more precise pipework pressure testing, pressurise the system slightly using an air pump and monitor pressure retention. Apply soapy water to suspected leak areas and look for bubble formation indicating gas escape.
Additional testing should occur after initial gas production begins. Conduct a thorough inspection around all pipe connections, the dome perimeter, and valve fittings using soapy water to identify bubbles indicating leaks.
For systems with accessible internal surfaces, temporarily introducing a harmless odourant into the chamber can help identify even minor leaks by smell. Address any leaks immediately with appropriate repair methods before continuing operation to prevent both efficiency losses and safety hazards.
Loading and Starting Your New Biogas Plant
Proper commissioning significantly impacts how quickly your system reaches full production capacity. The startup phase requires patience and careful monitoring as the necessary microbial communities establish themselves within your digester.
Expect limited gas production for the first 2-4 weeks as the biological processes stabilise, with full production capacity typically reached after 6-8 weeks of operation.
First-Time Filling Process
Begin by filling the digester approximately 80% full with clean water. This initial filling serves multiple purposes – it tests for leaks under actual operating conditions, provides the necessary environment for anaerobic bacteria, and establishes the working slurry level.
Allow this water to stand for 2-3 days while checking for any leaks or level changes. If leaks occur, empty the digester sufficiently to repair them before continuing.
Once leak testing confirms structural integrity, begin introducing organic material gradually. For the first week, add approximately 20-25% of the planned daily loading rate, mixing thoroughly with additional water as needed to maintain pumpable slurry consistency.
Increase loading incrementally over the following 2-3 weeks until reaching the designed daily input volume. This gradual approach prevents overloading the developing microbial community and reduces the risk of acidification that could inhibit methane production.
Starter Slurry Preparation for Faster Gas Production
Accelerate the establishment of productive microbial communities by introducing “starter” material containing active methanogenic bacteria. The most accessible starter material is fresh slurry from an operational biogas digester, ideally comprising 20-30% of your initial organic loading.
If available, introduce 200-400 litres of active digester content directly into your new system during the first filling. This inoculation can reduce startup time by 50-60% compared to systems started without active bacterial cultures.
If active digester material is unavailable, create an effective alternative starter by pre-fermenting a mixture of cattle manure and water (1:1 ratio) in a sealed container for 1-2 weeks before introduction.
Adding small amounts of rumen content from freshly slaughtered cattle further enhances this starter material. For systems utilising primarily food waste or crop residues, combining these materials with manure during startup provides the diverse bacterial communities needed for efficient digestion.
Monitoring the Initial Digestion Process
Careful monitoring during startup identifies potential issues before they compromise system establishment. Check pH levels regularly using simple test strips – optimal range is 6.8-7.2.
Declining pH indicates possible acidification requiring reduced feeding rates or addition of lime water to restore balance.
Monitor gas production by observing pressure gauge readings and testing gas flammability. Initial gas production is primarily carbon dioxide; combustible methane production typically begins after 10-14 days.
Observe slurry consistency in the outlet chamber – it should maintain a smooth, homogeneous appearance without excessive separation or floating layers. Unpleasant odours beyond normal earthy smells may indicate improper digestion requiring process adjustments.
Keep detailed records of daily feeding volumes, observed gas production, and any process adjustments during this critical establishment phase. These records provide valuable baseline data for future troubleshooting and optimisation efforts.
Daily Operation and Maintenance Essentials
Once established, fixed dome biogas plants require minimal but consistent maintenance to ensure optimal performance. Developing simple daily routines prevents the most common problems while maximising energy production.
The fundamental maintenance principle involves regular, moderate feeding rather than irregular, large additions that can disrupt bacterial balance.
Feeding Schedule and Optimal Slurry Consistency
Establish a consistent daily feeding schedule, ideally splitting inputs into morning and evening additions. This approach maintains steady bacterial activity and gas production compared to single daily feedings. Each addition should combine organic material with sufficient water to create a pumpable slurry – typically 1:1 ratio for manure or 2:1 water-to-solids ratio for drier materials like crop residues. The slurry should pour easily but maintain a yoghurt-like consistency rather than being watery.
Maintain feeding consistency across days whenever possible. Bacterial communities adapt to specific input characteristics; sudden changes in feedstock type or quantity can temporarily reduce gas production.
If significant changes in the feeding regime are necessary, implement them gradually over 7-10 days to allow bacterial adaptation. Remove floating or settled material from the mixing chamber regularly to prevent pipe blockages and ensure complete mixing before introduction to the main digester.
Monthly Maintenance Tasks You Shouldn't Skip
Several monthly maintenance procedures protect system integrity and performance. Inspect all visible gas pipes and connections for corrosion or damage, applying rust-preventing paint to metal components as needed.
Check valve operation by temporarily closing and reopening, lubricating if necessary with biogas-compatible lubricant. Clear condensate traps of accumulated moisture to maintain unobstructed gas flow. Test the water seal in the main gas trap and replenish evaporated water as needed.
Examine inlet and outlet chambers for excessive buildup of floating scum or settled solids. Remove accumulated materials to prevent pipe blockages and maintain effective chamber volume.
Where accessible, inspect interior surfaces of chambers for signs of cracking or waterproofing failure. During this monthly maintenance, also verify proper operation of all connected appliances, cleaning burners and jets as needed to remove accumulated cooking residues or combustion deposits.
Signs Your System Needs Immediate Attention
Certain symptoms indicate potentially serious problems requiring prompt intervention. Sudden pressure drops not associated with increased gas usage suggest leakage requiring immediate investigation.
Conversely, pressure that remains static despite gas usage indicates potential blockage in the distribution system. Complete cessation of gas production lasting more than 24 hours indicates possible process inhibition requiring feeding adjustment or pH correction.
Unusual odours around the plant may indicate gas leakage, while strong sulfurous smells from appliances suggest hydrogen sulfide filter depletion requiring replacement.
Slurry consistency changes in the outlet chamber, particularly watery discharge or undigested material, indicate process disruption or insufficient retention time. Visual dome displacement (rising above ground level or shifting laterally) suggests structural problems requiring professional assessment. Address these warning signs immediately to prevent system failure or safety hazards.
Troubleshooting Common Fixed Dome Issues
Even well-constructed biogas plants occasionally encounter operational challenges. Most problems fall into predictable categories with straightforward solutions.
Addressing issues promptly prevents cascading failures while maintaining consistent energy production.
Keep basic repair materials on hand, including pipe fittings, waterproofing compounds, and valve components for quick resolution of common problems.
Low Gas Production: Causes and Solutions
Insufficient gas output typically stems from either process inhibition or physical system issues. Process-related causes include temperature drops below 20°C, which can be addressed by insulating exposed components or adding solar heating elements.
Imbalanced carbon-nitrogen ratios in feedstock (optimal range 20:1 to 30:1) may require adjusting input composition by varying the mixture of manure and plant materials. Excessively acidic conditions, indicated by pH below 6.5 can be corrected by temporarily reducing feeding while adding calcium carbonate (agricultural lime) to restore alkalinity.
Physical causes of low production include excessive scum formation, creating a barrier layer inside the digester. This requires breaking up the layer by vigorously agitating inputs or introducing anti-foaming agents like vegetable oil (50-100ml).
Inadequate mixing of inputs before introduction leads to poor digestion; remedy by ensuring thorough mixing in the inlet chamber before feeding. Gas leaks reduce apparent production; conduct comprehensive leak testing using soapy water on all connections and repair as needed. Finally, slurry overfeeding displaces active bacteria; restore balance by reducing input volume for 7-10 days while maintaining a regular feeding schedule.
Dealing with Blockages in Inlet and Outlet Pipes
Pipe blockages represent one of the most common operational problems, but can typically be resolved without major intervention. Inlet pipe clogs usually result from inadequate mixing or introducing materials with excessive fibre length.
Clear these blockages using a flexible rod or high-pressure water introduced from the inlet chamber. Prevention includes more thorough mixing and chopping fibrous materials into 2-3 cm lengths before introduction. Severe cases may require temporarily removing inlet pipe sections for direct access.
Cracks in the Dome: Emergency Repairs
Emergency Dome Repair Kit
• 5kg rapid-setting waterproof cement
• Concrete bonding agent (1 liter)
• Hydraulic (water-stopping) cement (2kg)
• Wire brush for surface preparation
• Flexible waterproofing membrane (1m²)
• Application brushes and trowels
• Protective gloves and eyewear
• Clean water in spray bottle for curing
Dome cracks represent serious structural issues requiring immediate attention. For hairline cracks without active leakage, clean the area thoroughly and apply penetrating crystalline waterproofing that migrates into the concrete to form a permanent seal.
For wider cracks with active leakage, first apply hydraulic (water-stopping) cement to halt active water flow, followed by injection of flexible polyurethane or epoxy resin that maintains elasticity after curing. Learn more about the importance of structural integrity in biogas reactors.
Extensive cracking may indicate fundamental structural issues requiring professional assessment. Temporary emergency measures include reducing gas pressure by increasing consumption or controlled venting, followed by applying a flexible waterproofing membrane over damaged areas. For severe cases involving dome displacement, consider emergency gas removal and slurry level reduction to relieve pressure while arranging professional repairs.
Prevention remains the best approach to dome integrity issues. During construction, ensure proper concrete curing, adequate steel reinforcement, and multiple waterproofing layers. After construction, avoid excessive loading on ground surfaces above the dome, maintain consistent operating pressures, and conduct regular visual inspections for early problem detection.
Using Your Biogas: Connection and Application Tips
The versatility of biogas extends far beyond basic cooking applications. With proper equipment and connections, this renewable fuel can power lighting, refrigeration, small engines, and even electricity generation. Understanding the specific requirements of different applications ensures safe, efficient energy utilisation while maximising the value of your biogas production.
All biogas applications benefit from basic gas conditioning to improve performance and equipment longevity. At a minimum, implement a simple moisture removal system using a water trap at low points in the gas line.
For more sensitive applications, consider hydrogen sulphide removal using an iron oxide filter that prevents corrosion and extends appliance life. While not essential for basic applications, carbon dioxide removal through water or chemical scrubbing significantly improves energy density for applications like vehicle fuel or bottled gas storage.
Setting Up Your Kitchen for Biogas Cooking
Cooking represents the most efficient and straightforward biogas application. Convert your kitchen by installing specialised biogas burners designed for the lower pressure and different combustion characteristics of this renewable fuel. These burners feature larger jet openings (typically 1.2-1.5mm compared to 0.8-1.0mm for LPG) and different air mixers to accommodate biogas's lower energy density.
While converting existing LPG stoves is possible by enlarging jets, purpose-built biogas stoves provide superior efficiency and typically cost $30-60, depending on size and features. To understand why biogas is an excellent choice for cooking, you can explore why biogas is considered an excellent fuel.
Install proper gas control systems for kitchen safety and convenience. A main shutoff valve near the point of entry allows emergency isolation, while individual burner valves permit controlled cooking.
Consider installing a simple manometer (pressure gauge) to monitor system pressure – cooking performance typically requires a minimum of 8-10cm water column pressure.
For optimal performance, position the stove within 20-30 metres of the biogas plant to minimise pressure drops through piping. Longer distances require larger diameter pipes to maintain adequate pressure.
Lighting Systems Powered by Biogas
Biogas lighting provides valuable illumination in areas without reliable electricity. Traditional biogas lamps use incandescent mantles similar to propane lanterns, producing approximately 40-60 watts equivalent light output while consuming 0.1-0.15 cubic meters of gas per hour.
These simple, reliable lights require minimal pressure (5-8cm water column) and function effectively even with unfiltered biogas, though hydrogen sulfide removal extends mantle life significantly.
Modern alternatives include using biogas to power small generators connected to LED lighting systems. While less direct than mantle lamps, this approach provides superior lighting quality and flexibility.
A small 100W generator running 3-4 hours daily consumes approximately 0.6-0.8 cubic meters of biogas while charging batteries that power LED lighting throughout the evening. This integrated approach maximises energy utilisation by capturing generator waste heat for water heating or other thermal applications.
Small Generators and Other Power Applications
Biogas can power internal combustion engines with minor modifications, opening numerous mechanical and electrical applications. Small generators (1-3kW) typically require 0.5-0.7 cubic meters of biogas per kilowatt-hour produced. Engine conversion involves installing a specialised gas-air mixer, adjusting ignition timing to accommodate biogas's slower flame speed, and removing any liquid fuel components that could create unnecessary restriction.
These modifications cost approximately $100-200 for small engines, but dramatically expand your energy independence.
Turning Digestate into Premium Fertiliser
The nutrient-rich digestate flowing from your biogas plant's outlet represents a valuable agricultural resource often overlooked in system planning. This slurry contains nearly all nutrients from the original feedstock but in more accessible forms that plants can readily utilise.
Capturing and properly applying this byproduct transforms waste management into a comprehensive soil improvement program while providing significant economic value beyond energy production.
Nutrient Content Compared to Chemical Fertilisers
Biogas digestate contains macro and micronutrients in balanced proportions ideal for plant growth. Typical cattle manure-based digestate contains approximately 1.5-2.5% nitrogen, 1.0-1.5% phosphorus, and 0.8-1.2% potassium on a dry matter basis.
Unlike chemical fertilisers, where nutrients can quickly leach beyond root zones, digestate nutrients are released gradually as organic matter decomposes, providing extended feeding periods.
The anaerobic digestion process also increases nitrogen availability by converting organic nitrogen to ammonium forms that plants absorb more readily, improving nitrogen utilisation efficiency by 30-50% compared to raw manure application.

Safe Handling and Application Methods
While significantly less pathogenic than raw manure, fresh digestate still requires proper handling to maximise benefits and minimise risks. Store liquid digestate in covered containers to prevent nitrogen loss through ammonia volatilisation – simple plastic-covered lagoons or repurposed water tanks work effectively.
For immediate application, dilute liquid digestate with water at 1:1 to 1:5 ratios depending on crop sensitivity, applying directly to soil rather than foliage to prevent potential leaf burning from ammonia content.
For easier handling and broader application options, consider separating liquid and solid fractions. Simple gravity separation in settling tanks produces a nutrient-rich liquid suitable for irrigation systems and a fibre-rich solid fraction excellent for soil conditioning.
More sophisticated separation using screens or presses accelerates this process while producing consistent material streams.
The solid fraction benefits from 30-60 days of aerobic composting before application, which eliminates remaining pathogens while creating a stable, odour-free soil amendment. For more information on biogas systems, you can refer to the construction of fixed dome digester methods.
Digestate Application Guidelines
• Vegetable gardens: Apply 2-3 liters diluted liquid (1:3) per square meter monthly
• Field crops: 8-12 cubic meters liquid digestate per hectare before planting
• Fruit trees: 5-10 liters undiluted digestate per tree applied to drip line quarterly
• Composted solids: 0.5-1kg per square meter annually as soil amendment
• Houseplants: Dilute liquid digestate 1:10 and apply monthly
• Safety period: Allow 3-4 weeks between application and harvest for fresh consumption. For more information on how to manage digestate sludge, consider reading further resources.
Consider crop-specific application timing for maximum benefit. Leafy vegetables benefit from regular light applications during active growth periods, while grain crops typically require heavier pre-planting applications.
Perennial crops like fruit trees respond best to quarterly applications timed to coincide with key growth stages. Regardless of crop type, avoid application during heavy rain periods to prevent nutrient runoff, and maintain buffer zones around water sources to protect water quality.
Crops That Thrive on Biogas Slurry
Certain crops demonstrate particularly strong positive responses to digestate application. Leafy greens, including spinach, kale, and lettuce, show dramatic yield increases of 30-50% compared to unfertilized controls, while also benefiting from the balanced micronutrient profile that prevents common deficiencies.
Corn, with its high nitrogen demand, responds exceptionally well to digestate application with yield improvements of 20-40% and notably improved drought resistance due to enhanced soil organic matter.
Fruit-bearing plants, including tomatoes, eggplants, and peppers, benefit not only from improved nutrition but also from disease suppression effects.
Research demonstrates reduced fungal disease pressure in soils regularly amended with digestate, likely due to beneficial microbial populations that develop during anaerobic digestion.
For permanent plantings like orchards, regular digestate application builds long-term soil carbon reserves while providing sustained nutrition. This combination improves fruit quality metrics, including sugar content, size uniformity, and shelf-life – all valuable market advantages for commercial producers.
Real Costs and Savings: The Economic Picture
The economic case for fixed dome biogas plants combines immediate energy savings with long-term agricultural benefits. A comprehensive financial analysis considers construction costs, operational expenses, energy value, fertiliser benefits, and environmental advantages.
While specific values vary by location and system size, most household-scale plants achieve full return on investment within 2-4 years when all benefits are properly valued.
The economic advantage increases further when considering biogas plants as long-term infrastructure investments. Well-constructed systems typically operate effectively for 20+ years with minimal maintenance costs when care is taken at all times to prevent mineral soil entering the digester, representing excellent lifecycle value.
When factoring in the steadily increasing costs of conventional fuels and chemical fertilisers, the economic case becomes even more compelling over time. The true financial picture emerges only when considering these comprehensive, multi-decade returns rather than focusing solely on initial construction costs.
Investment Breakdown by Plant Size
Construction costs scale efficiently with digester size – larger systems cost more in absolute terms but less per unit of capacity. A small 4 cubic meter system suitable for a family of 3-4 typically costs $500-800 in materials and $200-400 in labour when using local workers.
Mid-sized 8-10 cubic meter systems appropriate for larger households or small farms range from $800-1,200 in materials with $400-600 in labour. Community-scale systems of 20-50 cubic meters can cost $2,000-5,000 but serve multiple households, dramatically improving per-household economics. For more information on biogas construction, check out this guide on constructing fixed dome digesters.
Material costs vary significantly based on local availability and quality requirements. Brick construction typically costs 30-40% less than concrete but may offer reduced longevity in some environments.
Prefabricated components like specialised gas valves and pressure regulators represent a small but important cost component, typically 10-15% of total material expenses. Transportation costs for materials can significantly impact rural projects – local material sourcing often proves more economical even when unit prices are somewhat higher.
Calculating Your Return on Investment Timeline
Accurate ROI calculation requires quantifying multiple benefit streams from your biogas system. Direct energy savings typically range from $15-30 monthly for cooking fuel replacement in a family of four.
Fertiliser value adds another $10-20 monthly when properly applied to productive agricultural land. Waste management value, though harder to quantify directly, adds $5-10 monthly in avoided disposal costs or environmental compliance expenses. Combined monthly benefits of $30-60 yield simple payback periods of 24-48 months for typical household systems costing $1,200-1,800 installed.
The calculation improves further when considering increasing conventional energy costs. With typical LPG or kerosene price increases of 5-10% annually in many regions, the relative value of fixed-cost biogas production grows yearly.
Similarly, rising chemical fertiliser prices driven by increasing natural gas costs (a primary production input) enhance the comparative value of digestate. When incorporating these escalating alternative costs, the effective payback period often shortens to 18-36 months while subsequent returns increase substantially.
Available Subsidies and Financial Support Programs
Many regions offer financial incentives that dramatically improve biogas economics. These programs typically reflect recognition of environmental and social benefits beyond direct user advantages.
National renewable energy initiatives in countries including China, India, Nepal, and Vietnam provide construction subsidies covering 25-50% of material costs for qualifying systems. International development organisations, including GIZ, SNV, and various UN agencies, offer technical assistance, quality control, and partial funding through targeted programs in specific regions. Learn more about renewable gas certificates and their role in the biogas industry.
- Government renewable energy subsidies covering 25-50% of equipment costs
- Carbon credit programs provide ongoing payments for verified emissions reductions
- Agricultural extension programs offering technical support and training
- Microfinance initiatives with favourable terms for renewable energy investments
- NGO demonstration projects providing partial funding for early adopters
- Community development grants for shared biogas infrastructure
Carbon financing represents an emerging funding mechanism with significant potential. Small-scale biogas plants typically reduce greenhouse gas emissions by 3-5 tons of CO2-equivalent annually through methane capture and fossil fuel replacement.
Under various carbon credit schemes, these reductions are currently valued at $15-40 annually per household system (Summer 2025). While individual household systems rarely justify the verification costs involved, aggregated programs collecting credits from multiple installations can generate meaningful additional revenue streams that further improve overall economics.
When exploring financial support, investigate both environmental and agricultural funding channels. Many biogas support programs operate through agricultural ministries, focusing on fertiliser benefits, rather than energy departments that emphasise renewable fuel.
This dual-purpose nature sometimes creates opportunities to combine different incentive programs for enhanced support. Local agricultural extension offices often serve as valuable information sources regarding available programs and application processes.
Your Path to Energy Independence Starts Here
Fixed dome biogas plants represent one of the most accessible and practical renewable energy technologies available to individual households. By converting readily available organic wastes into valuable cooking fuel and premium fertiliser, these systems offer remarkable environmental and economic benefits with minimal technical complexity.
Whether your motivation is reducing energy costs, improving agricultural productivity, or minimising your environmental footprint, biogas technology provides a proven, reliable solution. Green Energy Solutions can help you assess your site, design an appropriately sized system, and connect with qualified local builders to start your journey toward energy independence.
Frequently Asked Questions
The following questions address common concerns and provide important clarification for anyone considering a fixed dome biogas plant. Understanding these practical aspects helps set realistic expectations and ensures the successful implementation of your renewable energy system.
How long does it take to build a fixed dome biogas plant?
Construction timeline for a typical family-sized fixed dome plant (6-8 cubic meters) spans 3-4 weeks, including curing time. The excavation and foundation phase requires 2-3 days, wall construction takes 4-5 days, and dome construction needs 3-4 days.
Plastering, waterproofing and pipe installation require another 5-7 days. Critical concrete and masonry elements need 7-10 days of proper curing time before full loading. Larger community systems (20+ cubic meters) typically require 6-8 weeks for complete construction.
Planning for some weather delays is advisable, particularly during rainy seasons when masonry work may be interrupted.
Can fixed dome biogas plants work in cold climates?
Fixed dome plants can operate in cold climates with appropriate modifications. The critical factor is maintaining digester temperature above 15°C for minimal gas production, with optimal production occurring above 25°C.
In temperate regions, increasing digester depth (3-4 meters vs. standard 2-2.5 meters) provides better insulation using the earth's thermal mass. Additional strategies include greenhouse enclosures over inlet/outlet chambers, insulation layers above the underground dome, and incorporating solar heating elements or waste heat recovery systems.
For regions experiencing extended periods below freezing, more substantial interventions become necessary. These may include internal heating using a portion of the produced biogas, insulated covers with double-wall construction, or seasonal operation with alternative energy sources during winter months.
The economics of these additional heating systems must be carefully evaluated against expected gas production. In extremely cold regions, alternative digester designs, including insulated above-ground systems with active heating, may prove more practical than traditional fixed dome configurations.
What types of organic waste work best in a fixed dome system?
Animal manures provide ideal feedstock due to their consistent composition and inherent bacterial populations. Cattle manure offers excellent balance and stability, while pig and chicken manures provide higher gas yields but require more careful pH management.
Plant materials, including food scraps, crop residues, and green wastes, can be excellent inputs but typically require combining with manure (10-30% by volume) to provide bacterial inoculation and balanced nutrients.
Materials with high carbon-to-nitrogen ratios, like straw or wood chips, should be limited to less than 20% of input volume to prevent nitrogen deficiency that reduces gas production.
How much maintenance does a fixed dome biogas plant require?
Day-to-day maintenance is minimal, primarily involving regular feeding with properly prepared slurry and occasional cleaning of inlet/outlet chambers. Monthly maintenance includes checking gas pipes and valves for leaks, cleaning burners or appliances, and removing any accumulated scum in chambers.
Quarterly maintenance should include a more thorough inspection of structural elements for cracks or water infiltration, clearing any condensate from gas lines, and verifying proper operation of safety devices. Many systems operate for 5+ years without requiring any significant repairs when properly constructed and maintained. For further insights, you can explore the benefits of biogas as an excellent fuel.
The most common maintenance issues involve clearing blocked inlet or outlet pipes, replacing corroded gas valves (typically every 3-5 years), and occasionally removing accumulated sediment from the main chamber (every 8-10 years depending on feedstock).
These maintenance requirements typically represent less than 5% of the initial construction cost annually, making fixed dome systems among the lowest-maintenance renewable energy technologies available to households.
Is a fixed dome biogas plant safe to have near my home?
Properly constructed and operated biogas plants present minimal safety risks. The underground construction contains any potential gas leakage, while the relatively low pressure (typically under 100 cm water column) limits leak volumes. Basic safety features, including water traps, pressure relief valves, and flame arresters, further minimise risk. As a precaution, maintain minimum distances of 5-10 meters from living spaces, ensure good ventilation in areas where gas is used, and install simple methane detectors in enclosed spaces using biogas appliances.
The primary safety considerations involve ensuring quality construction, particularly regarding the gas-tightness of the dome and piping system. Proper education regarding system operation and maintenance significantly reduces operational risks. When comparing safety profiles with alternative cooking fuels like propane, kerosene, or wood fires, properly designed biogas systems typically offer equal or superior safety. Thousands of household biogas plants worldwide have established excellent safety records over decades of operation.
Green Energy Solutions provides comprehensive safety training with all system installations, ensuring your family can confidently operate your biogas plant with complete peace of mind. Our technical support team remains available to answer any safety questions that arise during your renewable energy journey.